Tired of chucking kitchen scraps that could make your garden shine? We had the same waste problem in our homes too. Then we found that a proper vermicompost bin turns rubbish into garden gold.
Our guide will walk you through building a simple worm bin with bits you might already have lying about. Did you know those little red worms can munch through half their weight in food scraps each day? Brilliant! Get ready to slash your waste and grow much happier plants with your very own worm farm.
It’s dead simple once you get started, and the garden will thank you come spring.
What is Vermicomposting?
Vermicomposting is a simple way to recycle kitchen scraps with the help of worms. We use special worms called red wigglers (Eisenia fetida) that eat our food waste and turn it into rich soil.
This eco-friendly practice creates natural fertilizer without chemicals. The worms break down organic matter through a process called bioconversion.
Our worm bins work well indoors, making them perfect for flats or homes with small yards. This form of earthworm composting helps us reduce what goes to landfills while giving us free plant food.
Many gardeners love vermiculture because it makes plants grow better than store-bought soil mixes. The dark, crumbly worm castings add vital nutrients that plants need to thrive.
Benefits of Vermicomposting
Vermicomposting offers amazing perks for your garden and the planet. We’ll show you how this simple process turns kitchen scraps into black gold for your plants.
Reduces household waste
We love how vermicomposting helps cut down our kitchen waste significantly. Our homes produce lots of food scraps daily that often end up in landfills. A worm bin gives these scraps a new purpose! Instead of tossing banana peels, coffee grounds, and veggie bits into the bin, we feed them to our worms.
This simple step keeps organic waste out of landfills and turns it into something useful.
The impact on waste reduction is quite impressive. Each worm bin can process several pounds of kitchen scraps monthly, depending on its size and the number of worms. Our planet benefits from this eco-friendly practice as less waste means fewer garbage trucks on the road and less methane from landfills.
Waste management becomes easier at home too – our rubbish bins stay cleaner and need emptying less often.
Produces nutrient-rich compost
Vermicomposting creates natural fertiliser that’s packed with nutrients your plants will love. Our worm bins transform kitchen scraps into dark, crumbly compost that boosts soil fertility and plant nutrition.
This organic matter improves microbial activity in the garden, making it perfect for sustainable and eco-friendly gardening practices.
Worm castings are nature’s perfect plant food – rich in nutrients and beneficial microbes that plants crave.
The nutrient-dense soil amendment from our worm bins can be harvested every 3-6 months, providing a steady supply for your garden needs. These castings work brilliantly for both garden beds and potted plants, adding essential elements that support healthy growth.
The decomposition process creates a balanced mix of nutrients that releases slowly, feeding plants over time rather than all at once. Next, let’s look at the supplies you’ll need to build your own vermicompost bin.
Supports sustainable gardening
Vermicompost bins help us create a more sustainable garden system. We turn kitchen scraps into rich soil instead of sending them to landfills. This simple practice cuts down on waste while giving our plants natural nutrients they need to grow strong.
Our gardens become more eco-friendly with worm-made compost. The process uses no chemicals and works well even in small urban spaces like apartments. Plants grown in worm castings often need less water and stay healthier without artificial fertilizers.
Many city dwellers find this method perfect for their limited space while still supporting green living goals.
Supplies Needed to Build a Vermicompost Bin
You’ll need a few basic supplies to build your perfect worm bin. Read on to learn how to set up your own thriving vermicompost system at home!
A bin or tub of the right size
We need to start with the perfect container for our worm friends. The right bin makes all the difference in creating a thriving worm home. Most worm bins should be wide rather than deep, as worms live in the top layers of soil.
Our tests show that layered bins like the Worm Factory 360 work very well for most homes. For those on a budget, a DIY bin can be built for under £5 using simple items from your local shop.
The best worm bins give your worms room to move but aren’t so large that the bedding becomes hard to manage.
Two 5-gallon buckets stacked together make an ideal starter worm composting bin. The top bucket holds the worms and food scraps, while the bottom one catches any liquid that drains through.
Plastic storage tubs also work well for homemade compost bins. We prefer dark-coloured containers as they block light and keep worms happy in their dark home.
Bedding material (paper, coco coir, or leaves)
After choosing the right bin size, we must focus on proper bedding for our worms. Bedding material forms the base of our vermicompost system. We prefer shredded paper as it makes an excellent organic bedding choice.
Our worms need this paper spread about three inches deep throughout the bin. The bedding should stay moist but never have standing water. This creates the perfect home for worms to settle in.
Good bedding helps worms adjust to their new home quickly. Paper works well because it breaks down over time, adding to the compost. Coco coir and dry leaves serve as great alternatives for sustainable composting.
These natural materials hold moisture and provide air pockets that worms need. The right bedding keeps our worm bin balanced and productive from day one.
Compost worms (e.g., red wigglers)
Compost worms are the heart of any successful vermicompost bin. We recommend red wigglers as the best choice for beginners because they eat a lot and breed quickly. These small, reddish worms turn food scraps into rich castings faster than other types.
Our shop offers 2000 Red Composting Worm Mix for £64.95 or a smaller 1000 worm mix for £42.95.
European night crawlers serve as another good option for your worm bin. They grow larger than red wigglers and can handle more food waste. These worms cost £49.95 for a pack of 500.
Both types work well in home bins, but red wigglers tend to stay in the top layers of bedding where most food scraps sit. The worms you pick will depend on your bin size and how much waste you need to process.
Dirt or grit
We need one pound of dirt or grit for our worm bin setup. This dirt must be free from chemicals that might harm our worms. The soil plays a vital role in the digestive process of worms as they lack teeth.
Grit helps these tiny creatures break down food in their gizzards.
Good soil is the foundation of successful vermicomposting – it gives worms the grit they need to digest organic matter.
The dirt mixes with shredded paper and water to create the perfect home for your compost worms. This mixture forms a balanced bedding that supports microorganisms and helps recycling of organic matter.
Red wigglers thrive in this environment, turning your kitchen scraps into nutrient-rich compost for your garden.
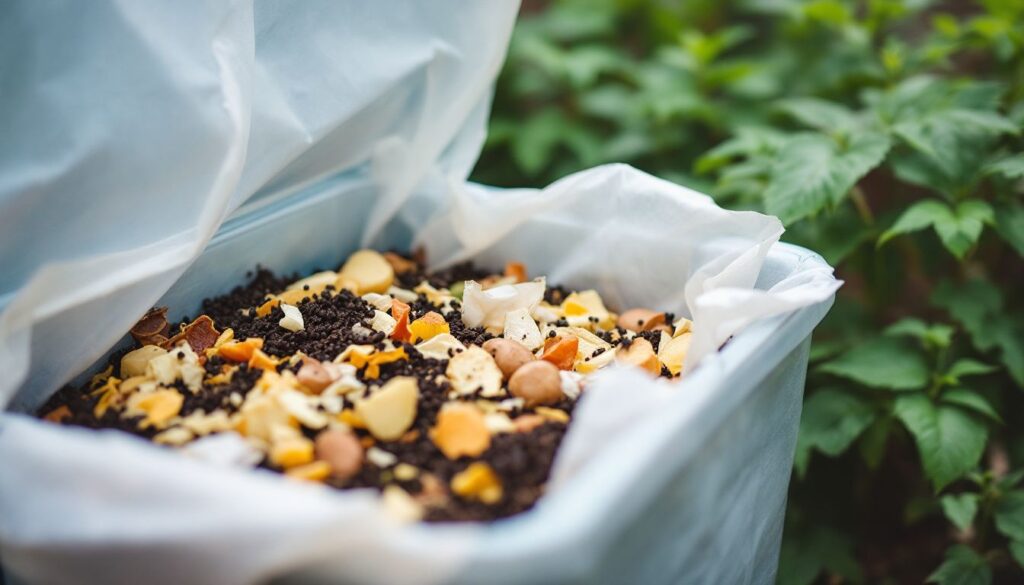
Food scraps
Food scraps form the heart of our vermicompost system. We feed our worms vegetable peels and fruit scraps which they happily turn into rich compost. These kitchen leftovers break down quickly in the bin, thanks to our hungry red wigglers.
Our worms need time to eat through each batch of scraps, so we only add new food once they’ve finished the previous serving.
Not all kitchen waste works in a worm bin. We avoid putting meat, dairy products, or woody items in our bin as these can cause bad smells or take too long to break down. Plastic items must never go into the bin since they won’t decompose and could harm our worms.
This careful selection of organic waste ensures our bin stays healthy and produces nutrient-rich soil for our gardens.
Preparing the Vermicompost Bin
Preparing your vermicompost bin properly sets the stage for happy worms and rich compost. You’ll need to create air holes, decide on drainage, and pick the perfect spot for your bin.
Read on to learn how to set up your worm home just right!
Adding air holes for ventilation
We need to drill 1-inch holes near the top of our vermicompost bin to ensure proper aeration. These breathing holes create essential airflow that keeps our worm habitat healthy and working well.
Good air circulation prevents the bin from becoming too wet or smelly. The perforations also stop fruit flies from making a home in our compost system. Proper oxygenation helps our worms break down food scraps faster and more efficiently.
Our bin needs these ventilation holes to maintain the right balance of oxygen. Without them, the compost might become too wet and start to smell bad. The holes should be placed high enough to provide air without letting worms escape.
This simple step in compost bin preparation makes a big difference in how well our vermicomposting system works.
Deciding on drainage holes
After adding air holes for proper ventilation, we must focus on drainage holes for our vermicompost bin. Proper drainage stops your bin from becoming waterlogged and keeps worms from drowning.
We drill 1/8-inch holes at the bottom corners of the bin to allow excess liquid to escape. This simple step creates an effective drainage system that prevents puddles from forming inside.
Good drainage keeps the bedding aerated and stops it from getting too wet. Excess moisture can harm your worms and make the bin smell bad. The small drip holes let liquid runoff flow out while keeping the worms safely inside.
Our bin stays at the right dampness level without becoming saturated, which helps our worms thrive and break down food scraps faster.
Choosing an ideal location for the bin
Now that you’ve sorted out drainage holes, finding the ideal spot for your vermicompost bin is our next step. We prefer keeping bins indoors to protect worms from harsh weather. Basements work perfectly as they stay cool in summer and warm in winter.
The spot you pick should be easy to reach, so under-sink areas or countertops make great choices for daily feeding. Your worms need a stable home with normal room temps—not too hot or cold.
The perfect location means you’ll check on your bin more often, which leads to better compost in the end.
Setting Up the Bin
Setting up your bin properly will make all the difference to your worms’ health and happiness. We’ll show you how to create the perfect home for your wriggly friends with the right bedding, moisture levels and feeding spots.
Adding and dampening bedding material
We start our bin setup with proper bedding material. Shredded paper makes an excellent base for our worm home. We fill the bin about three inches deep with this material, then mix in a small amount of soil.
The soil helps worms digest their food and provides grit for their gizzards. Next, we add water to create the right moisture content. The bedding should feel like a wrung-out sponge – damp but not soggy.
This dampened environment keeps worms happy while avoiding pooling water at the bottom.
Our red wigglers need this moist bedding to breathe through their skin. Too dry, and they can’t survive. Too wet, and they might drown. The perfect bin filling balances moisture with air flow.
We make sure the bedding depth stays around three inches to give worms enough space to move and process food scraps. This simple bedding mixture creates the ideal home for our composting helpers.
Introducing worms to the bin
We need to add one pound of red wriggler worms to our prepared bin. These busy composters will turn our kitchen scraps into rich soil. The worms might seem shy at first, so we give them a full day to settle into their new home.
This waiting period helps them adjust to the bedding and temperature. A simple trowel works best for gently moving the compost around once they’re settled. The trowel helps us check on our worms without hurting them.
Creating the right starting conditions means our worm bin will become a thriving habitat where these helpful creatures can work their magic.
Feeding the worms properly
We feed our worms with vegetable peels, fruit scraps, tea bags, and coffee grounds. These items break down quickly in the vermicompost bin. Our worms love these kitchen scraps and turn them into rich compost.
Meat and dairy products must stay out of the bin as they cause bad smells and attract pests. Plastic and woody items don’t break down well, so we avoid adding these materials too.
To keep our worm bin pest-free, we always cover fresh food scraps with moist paper. This simple step stops flies and other bugs from finding the food. The paper also helps control moisture in the bin.
Our worms eat about half their weight in food each day, so we start with small amounts and add more as needed. Proper feeding keeps our worms happy and our compost bin working well for sustainable living.
Maintaining the Vermicompost Bin
Maintaining your worm bin takes a bit of care to keep your worms happy. We need to check on our little workers often to make sure they have the right home.
Monitoring moisture and airflow
We need to check our vermicompost bin often to keep it just right for our worms. The bin should feel like a wrung-out sponge – moist but not soaking wet. Too much water leads to bad smells and fruit flies in your bin.
Good airflow stops these pests and helps break down food scraps faster. Air holes on the sides and top of your bin are vital for proper air movement. Every few months, we must scoop out any liquid from the lower part of the bin.
This stops water from pooling at the bottom, which can harm worms. A quick weekly check of moisture levels will keep your worm farm happy and working well.
Feeding the worms the right food in proper amounts
We feed our worms only after they’ve eaten their previous meal. This stops the bin from getting smelly and keeps our worms happy. Red worms love fruit and veggie peelings, which break down fast in the bin.
Coffee grounds, tea bags, and crushed eggshells also make great worm food. Our trick is to place food on just one side of the bin. This helps the worms move across the bin as they eat, making it easier to harvest castings later.
Small pieces break down faster, so we chop larger scraps before adding them to our vermicompost bin.
Managing temperature during summer and winter
Temperature control is vital for happy worms in your vermicompost bin. Our worms thrive in temperatures between 40°F to 85°F, so we must protect them from extreme heat and cold. During summer, we place our bins in shaded spots or bring them indoors to avoid overheating.
In winter, we add extra bedding for insulation or move bins to warmer areas like garages or basements. Thermal regulation becomes easier with proper bin insulation – simple materials like old blankets or straw can help maintain stable conditions.
Indoor composting offers the best climate management year-round as it shields worms from outdoor temperature swings. Proper seasonal maintenance ensures our worm population stays active and keeps breaking down food scraps.
Next, we’ll look at how to harvest those nutrient-rich worm castings your plants will love.
Harvesting Worm Castings
Harvesting worm castings is a simple process that yields rich, dark compost for your plants. We’ll show you how to collect these nutrient-packed castings without harming your worms.
Read on to learn our best tips for using this “black gold” in your garden!
How to collect and use worm castings
We collect our worm castings every 3-6 months for the best results. The easiest method involves exposing the compost to bright sunlight, which makes the worms move downward. This allows us to scrape off the top layer of dark, rich worm humus without disturbing our wriggly friends.
Our gardens love this nutrient-packed worm manure! We apply the gathered worm fertilizer directly to soil around plants or mix it into potting soil for indoor plants. The worm byproducts boost plant growth and health without the need for chemical fertilizers.
Many gardeners call this black gold because plants respond so well to the nutrients in worm droppings.
Expanding or Upgrading Your Worm Bin
As your worm family grows, you might need a bigger home for them. We can show you how to build a stacked bin system or move to a flow-through design for easier harvesting.
When and how to expand your system
Your worm family will grow over time, which means you’ll need more space for them. We suggest adding a second perforated bucket on top of your current bin. The worms will move up through the holes when they search for fresh food, making it easy to collect castings from the bottom bin.
This simple upgrade helps manage your growing worm population without starting over.
Many gardeners share extra worms with others in their community. Platforms like Freecycle or Nextdoor offer great ways to connect with local gardeners who want to start their own worm bins.
For those looking to get more serious about vermicomposting, the Worm Factory 360 provides a complete system with multiple trays. This upgrade makes it easier to harvest castings and gives your worms more room to work.
Now let’s look at how to collect and use those valuable worm castings.
Conclusion
Building a worm bin opens up a world of green living right at home. You’ll turn kitchen scraps into black gold for your garden while cutting down waste. Worm farming takes little space and works year-round with proper care.
Red wigglers do all the hard work – you just feed them and collect the rich castings. Your plants will thank you for this nutrient-packed compost that helps them grow strong and healthy.